UPDATE:
The method described below worked before Western Digital official supported the drive on a Mac. They now have both the firmware update tool and software to run as either a dual drive of a fusion drive on a Mac:
http://support.wdc.com/KnowledgeBase/answer.aspx?ID=11750
http://support.wdc.com/downloads.aspx
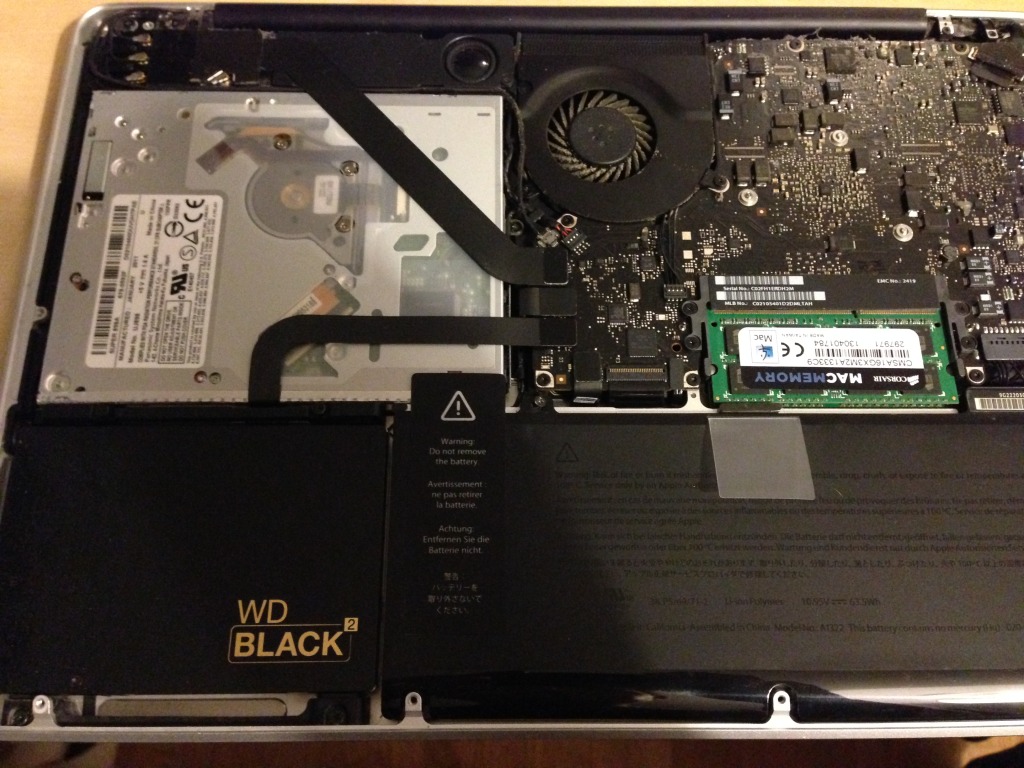
The Western Digital Black² is a 120GB SSD with a 1TB 7200rpm regular hard drive in a single 2.5″x9.5mm case. I thought it would be ideal for both expanding and speeding up my MacBook Pro 13″ without needing to use a hard drive caddy and remove the DVD drive, which I still use from time to time.
I went ahead and got one without realising it wasn’t compatible with a Mac. Since the move to Intel almost everything is these days, so I just assumed it would be. Not wanting to give up, I did some Googling and found that AnandTech reports that once partitioned using Windows, it is readable on a Mac.
Annoyingly you have to install the Black² as an internal drive in computer, otherwise the automatic partitioning tool won’t recognise it. I din’t have a Windows PC I could put this in, so I had to install it in my Mac first, install windows just to use the partitioning tool, and then copy back over my Mac OS. This is all the steps I did to get it working:
1) Backup your existing drive, its important to do this often anyway, but especially since this is not supported, I or Western Digital will not be responsible for any damage or loss suffered to you, your hardware, or your files.
2) Remove your old hard drive and install the Black² in its place.
3) Install Windows (I used Windows XP, so I also had to remove a ram chip to leave it with only 4GB RAM).
4) If on Windows XP SP2, install Windows Installer 3.1, download it onto a USB drive first so you don’t have to install the bootcamp drivers to get the WiFi working.
5) Run the WD Black² partitioning tool.
6) Hold the Alt key while booting and boot onto your backup or original hard drive on USB.
7) The Black² should now have two visible partitions. Erase existing partitions so that you’re left with one big one.
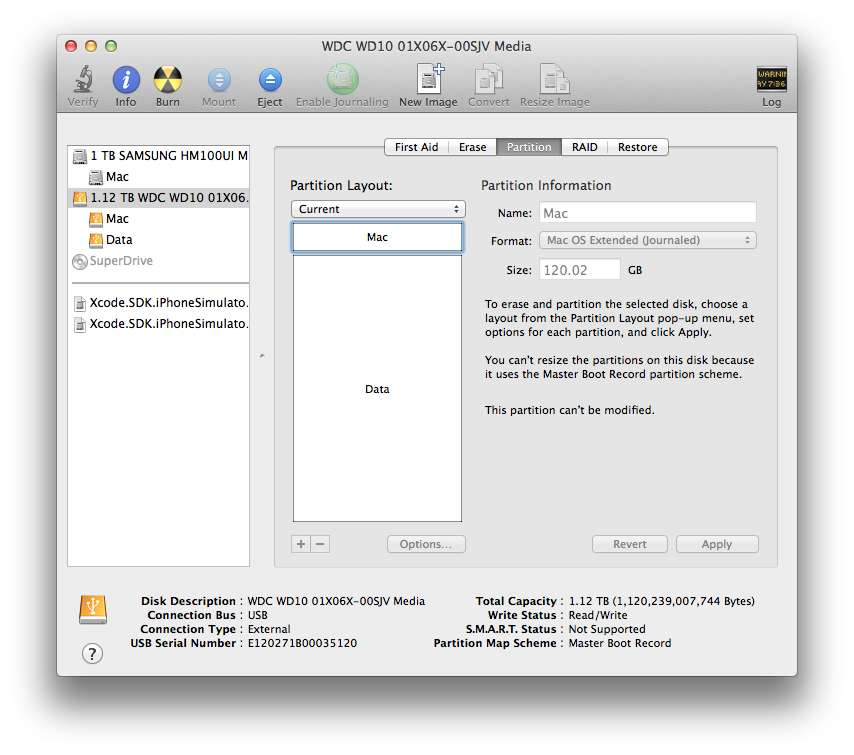
8) Create 2 partitions, the first one 119.8GB, and the rest for the remaining. I experimented with different sizes, but 119.8GB left the right block sizes (see appendix).
9) (Recommended) Add an additional partition of 1GB to the end of the first (SSD) partition you just created. I then cloned by old recovery partition using the instructions here. Update: I’ve changed this from optional to recommended, since when I tried to upgrade to OSX 10.10 Yosemite it couldn’t install because it wasn’t able to create the Recovery HD. I also tried to create it with Carbon Copy Cloner as a 650MB partition and that failed too. I don’t know if its because my partitions weren’t quite right and were overlapping the SSD/HD but when I created the Recovery HD as a 1GB partition it worked, and Yosemite installed.
10) Clone less than 120GB of your original or backup hard drive onto the SSD. If you have more data, you may need to clone your home folder on to the magnetic hard drive bit.
11) (Optional) If you have too much data for the 120GB, clone your home folder to the magnetic hard drive partition, and after booting up, move your home folder location.
12) (Recommended) Enable Trim. You can use Trim Enabler (paid) or what I used Chameleon SSD Optimizer (free). If anyone is interested, there seems to be an extra hardware controller in between the SATA and the drives to make sure trim command only effect the SSD not the magnetic partition.
Notes:
There has been one or two settings that have changed on my Mac. I’m not sure if this is a result of moving my user home folder, cloning the hard drive, or something else. It seems unlikely that it would be because of using the Black², but I’ll report back as I’ve spend more time using the system. The settings changed were:
– Custom screenshot location overridden
– Mac gatekeeper changed from “All” to “Trusted”
Also strangely Western Digital do have a firmware update tool for the Black2 that does work on a Mac. I haven’t tried it, and not sure if I will yet.
Updates:
– I just tried to update to Yosemeti and realised it won’t install if the partitioning scheme is master boot record instead of guid. I updated above to include these steps.
– In searching to fix the partitioning scheme problem I found that someone else has done this before, and also turned it into a full fusion drive!
– I also found this article helpful for how to check out the partition sizes in detail.
– Also since doing this upgrade I’ve noticed I get the the “Disk too slow (recording) -10004” error when using GarageBand. I’m not sure if its the hard drive, or making the upgrade to Yosemite on an older Mac, but now I have to record to an external hard drive (not the one that the OS is on. I used to be able to do this when I had a normal hard drive. The disk isn’t slow, my boot times are at leas 6-10 times faster, but it maybe “glitchy” in a way that GarageBand doesn’t like.
Appendix:
Partition Block Sizes using sudo gpt show /dev/disk0
After WD Black2 Tool on Windows + Converting to GPT. I really should have done this before converting to GPT for it to be more accurate. From this you can see that the last block of the 1st partition should of the 120GB SSD partition should be at most 234420417 + 63 = 234420480 to be sure its on the SSD. In addition the start of the 2nd block should be at least 234442752.
       start        size  index  contents

           0           1         PMBR

           1           1         Pri GPT header

           2          32         Pri GPT table

          34          29

          63   234420417      1  GPT part - 48465300-0000-11AA-AA11-00306543ECAC

   234420480       22272

   234442752  1953523712      2  GPT part - 48465300-0000-11AA-AA11-00306543ECAC

  2187966464         319

  2187966783          32         Sec GPT table

  2187966815           1         Sec GPT header
After deleting original partitions and formatting to two partitions using Disk Utility and the first set to 119.8GB. Apple creates the EFI partition at index 1, so now index 2 is the 120GB we will store the OS on. The last block of this partition 233984376 + 409640 = 234394016 which is < 234420480. Apple also intentionally creates a large gap after any user partitions. This makes the first block of the normal hd partition start at 234656160 which is > 234442752.
       start        size  index  contents

           0           1         PMBR

           1           1         Pri GPT header

           2          32         Pri GPT table

          34           6

          40      409600      1  GPT part - C12A7328-F81F-11D2-BA4B-00A0C93EC93B

      409640   233984376      2  GPT part - 48465300-0000-11AA-AA11-00306543ECAC

   234394016      262144

   234656160  1953048472      3  GPT part - 48465300-0000-11AA-AA11-00306543ECAC

  2187704632      262151

  2187966783          32         Sec GPT table

  2187966815           1         Sec GPT header
After I used Carbon Copy Cloner to create the recovery partition on the SSD, this is what I get:
       start        size  index  contents

           0           1         PMBR

           1           1         Pri GPT header

           2          32         Pri GPT table

          34           6

          40      409600      1  GPT part - C12A7328-F81F-11D2-BA4B-00A0C93EC93B

      409640   231887224      2  GPT part - 53746F72-6167-11AA-AA11-00306543ECAC

   232296864      262144

   232559008     1835008      3  GPT part - 426F6F74-0000-11AA-AA11-00306543ECAC

   234394016      262144

   234656160  1953048472      4  GPT part - 48465300-0000-11AA-AA11-00306543ECAC

  2187704632      262151

  2187966783          32         Sec GPT table

  2187966815           1         Sec GPT header